3D Modeling and Look Development

SANM 560: Inter-Campus Collaboration
The SANM 560 class is designed to simulate the experience of working for a company to create a 15-30 second advertisement from start to finish. Students work in a small team with members from both the Savannah and Atlanta campuses to develop their own concept and bring it to life within a 10-week period.
FINAL SHOT:
Entry 10: May 28th, 2025
Following a recent critique, further refinements have been made to the smoke shader to decrease the saturation and fix the flatness of the smoke. I realized the shadow color needed to be set to a lighter color to increase shadows/contrast and switch it from navy to a lighter purple.Part of the issue was that my smoke light was too bright and killing the shadows, so I adjusted the position and intensity of the lights affecting my smoke. The blue rim light on the skull was also increased to give the skull more 3D shape.Finally, it was brought to my attention that I never set-up a shadow pass for the smoke, so I quickly set up a shadow matte layer and comped the shadow back in with Nuke. I feel like the shadow pass needs some improvement, but unfortunately, I've run out of time to fix it for our final submission.


Smoke Shader Before:

Smoke Shader After:
Entry 9: May 22nd, 2025
This week has mostly focused on refinement of the smoke simulation. After some unsuccessful troubleshoot, I ended up fixing the issue of the smoke waving around at the beginning by turning off the pyro turbulence and starting it from scratch. The initial velocity and density were then both increased to give the smoke a more thick, billowy feel.Following my professor's advice, I also switched to using a Pyro shader (which I didn't know existed before) to improve the look of the smoke. This drastically improved the color and made density easier to adjust after caching.As the end of the quarter approaches, there's isn't much time to make adjustments beyond this as I've had to take over some of the video and sound editing work.
Pyro Volume for smoke set-up


Before Shader and Turbulence Adjustments


After Shader and Turbulence Adjustments
Latest Smoke FX update
Entry 8: May 16th, 2025
First test render with all shot elements has been completed. The sim was imported into the scene file and lined up with the skull animation using copy to points, and the skull was then added as a collision object.The smoke was created using two solvers: a pyro and a point solver (with the pyro cache fed into it) to create more density and wispiness. Upon seeing the result of the volume smoke, I no longer feel that the particle sim is necessary and have decided to remove it. Moving forward, I'd like to refine the smoke to wave around less at the beginning, add a color gradient to the smoke, and fix the lighting on it.

Point solver set-up for smoke wisp (above)

Pyro smoke set-up (above)

Density age ramp for smoke wisps

Wisp Smoke sim set-up

Entry 7: May 9th, 2025
Frustratingly, this week has featured a lot of setbacks and I have again yet to make as much progress as I hoped on my smoke sim.
During the week, I fixed an issue with the vertebrae texture, redid my animation to compensate for the change in camera angle in my new footage, and set up lighting. Lighting was difficult as my shot is overexposed and no HDRIs were shot despite my several requests. The scene reflections are faked using an HDRI sourced online, and I used spotlights to create the sun lighting, fill lighting, and the pink highlights from my 2D design. I feel the navy board looks out of place on the overexposed, white ground, (especially since the skateboard has no shadow) but for now I'm moving on to more pressing matters.
My smoke sim is slowly starting to come together, though I am currently troubleshooting an issue with getting the fine, wispy look of it. I've been developing it outside of my scene file and plan to transfer it in later so right now I can just focus on the smoke's look alone.
Latest lighting and animation pass
Starting Smoke Tests


Initial pyro set-up
Smoke color ramp
Entry 6: May 2nd, 2025
As of April 28th, we've officially had a change in leadership on our team, and with it has come many improvements in file organization and developing plans and deadlines. We finally have a sound designer on the project, courtesy of our newly promoted supervisor, and as of this afternoon I officially have all the footage necessary for my FX shot.
There's also been major changes to our concept to mitigate issues we've been having with our filming and actor. I developed a new storyline that would allow us to reuse footage that didn't feature our actor and pitched it with my team to our professors. It's hard to let go of the old concept, but the new one was received positively and the changes I made will allow us to move forwards with our work instead of staying stationary.
I've started test animations of the skull emerging from the board. Fortunately, the flash in transitions from 2D to 3D will hide most of the initial emergence, which saves me time on fine tuning the start of the animation. Less progress has been made on the sim, but I will use pyro to create smoke from the particles that are exiting from the mouth.


Entry 5: April 25th, 2025
Reshoots of footage took place between Thursday and Saturday. The new material is better, but admittedly, I'm still unimpressed by the quality and share concerns with a couple of my teammates that the new footage doesn't match the vibe and storyline of our ad and brand. We will attempt to pivot to a more chill and casual mood, as our skater was unable to land the tricks that would've added energy to the footage.
Now that filming is a wrap, I'm playing catch-up to get back on schedule with texturing and animation. My model is UVed and texturing is almost complete. My first pass at creating the bone shader was done procedurally in Maya, and I planned to add suture lines via Photoshop. However, I wasn't happy with the result and decided to restart in Substance Painter. I felt that Substance would better suit the texture's needs, despite having never used it before, as proceduralism wasn't providing the control I needed and created issues with visible seams.
I've completed some previs with the now acquired footage, and am confident that my vision for this shot is achieveable and will work as intended.


First skull material test (above) -- Maya proceduralism


Second skull material WIP (above) -- Substance Painter
Entry 4: April 16th, 2025
Filming over the weekend was overall unsuccessful, which unfortunately means animation previs is delayed. During the shoot, I took up the role of camera man, which was a tad outside my comfort zone but very exciting. We started simple and saved trick shots for last --in case of an injury-- and troubleshot several issues on set, such as achieving our dolly shots without a dolly. However, I had concerns about overexposure and our actor's ability to meet the energy required for each shot.
While we got all the shots we needed, after reviewing the project supervisor's rough cut, we quickly realized the quality wasn't high enough to match our vision. My concerns about energy levels and lighting were spot on, and furthermore, I had been unaware of how much steadying the camera movement would crop in, and our dolly shots weren't cropped correct.
Prior to today's class, I took detailed notes on the issues in each shot, and the team discussed our next steps to get back on track during class-time. We will reshoot this weekend so we can move forward with animation previs ASAP, and as for my model, I'll take this opportunity to complete all my UVing and texture painting.

UVs for Skull Model
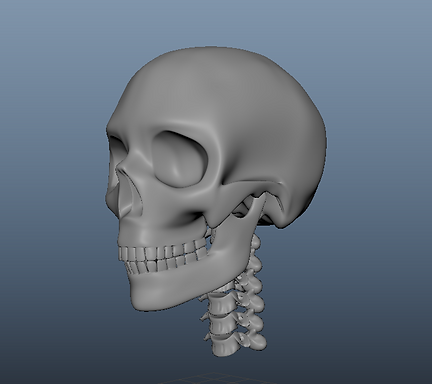
Entry 3: April 9th, 2025
My team's checkpoint for today was having first passes of all 3D models completed. I started my model one week ago, after making several orthographic-view skeleton blueprints in Photoshop. Initially, I was using online reference material, but struggled to get a good grasp on the details and shape of the vertebrae. To remedy this, I decided to go to Garvin Hall to observe and photograph the skeleton models on display. This helped immensely with creating the look of my model. My next steps will be to turn of symmetry and add imperfections to the model and commence on UVs and texturing.
Currently, I only plan to have the neck and skull coming out of the board design, but it occurs to me that I may need to model the collar bone and more of the spine to get a enough depth and dynamicity in the shot. After we shoot our footage this weekend, I plan to do some previs tests to confirm whether my shot will work as I intend.


Entry 2: April 2nd, 2025
This week, the team has finalized our shot list and began to prepare for filming through scouting locations and coordinating resources and schedules.
Over the weekend, I created concept art for our company's logo and 4 unique skateboard concepts to use for my own skate shot. After feedback, I chose the smoking skeleton concept for my final design. The plan is to have the skull, neck and top part of the rib cage lean out of the board, and the skeleton breathe out the magenta smoke. This weekend, I will make progress on 3D assets and clean-up storyboards for our next dailies round with our VFX mentors.

Logo concept art (above) final logo, cleaned up by Sarah Via (below)


Final Skateboard Design
Entry 1: March 28th, 2025
During the first week of the quarter, my team developed and pitched our ad concept for an imaginary skateboard shop called Savannah Skate Shop. Our story follows a uninspired skater who is lagging behind his skateboard, until a new, better board rolls up under his feet and brings the color and excitement back into his world. As the newly inspired skater starts doing tricks on his board, the footage slows to reveal the skate deck designs, that burst out of the board into 3D.
My primary responsibilities have been creating the first storyboard pass and assisting in branding and board design ideation. Our plan is divide up the different skateboard trick shots so that each 3D artist on the team can design and bring to life their own deck design.
