- VFX Artist

VSFX 425: Photorealistic Rendering
- Weekly Class Progress -
Table of Contents:
Project 1: Photography Fundamentals
Project 2: Materials Quilt
Project 3: Fantastical Plant
Project 4: Storytelling Lighting
Entry 1: March 31st, 2025
The first assignment for this class was to demonstrate an understanding of photography fundamentals by photographing series of images. I went out with a classmate on Friday morning to shoot locations around our dorm. Initially, we both struggled with our shots focused on DOF, composition for storytelling, and high detail plant bloom, but we were able to wrap shooting in just a couple hours.

Entry 1: April 6th, 2025
Project #2 is to create a 'materials quilt', featuring a variety of metals, organic materials, plastics, water, and glass. Over the weekend, I compiled reference images for all 20 materials, and assigned a blank VRay shader to each sphere in the quilt. I also began assigning base colors and metalness value to some of the quilt 'tiles', just to distinguish each sphere and give my work some additonal organization.
Admittedly, I'm off to a slower start than anticipated. I'm familiar with texturing in Houdini using code, and haven't used nodes for developing complex textures before. Part of my time has been spent just exploring the different nodes and names of attributes in Maya's hypershader to bceome more comfortable with them prior to diving in.

Entry 2: April 11th, 2025
Between my class during the weekdays, I setting up my Render Setup layers for the close ups of each individual texture.
This evening, I spent ~5 hours starting to nail down the fine details of some of the textures I'd already started. I began with my metals and plastics (on the left), and will slowly be working my way right towards the more organic shaders, as they will be more complex and irregular.
All my opaque materials only have roughness, diffuse color, metalness, and bump attributes adjusted, For my metals (column 1), I layered 2D noises with stretched UVs to attain a 'brushed' effect on the surfaces. For the scratched aluminum, I did the same, but with various rotations of the bump UVs to have my scratches run in a variety of directions.
To visually switch things up, I tried to avoid noise and use other 2D textures in Maya for my plastics, rubber, and fabric, such as the bulge, cloth, and grid textures. These materials had more focus on bump than roughness/metalness values to achieve a realistic look.
In honesty, I feel that I am struggling with staying on track with this project and staying energized in class, due to my intense schedule. My goal for the weekend is not only to catch up on and finish my quilt, but to also devise a strategy to better manage my time so I can put more effort into this course. However, though I didn't begin as early as I would've liked, I'm still confident I will meet the deadline.


Entry 3: April 14th, 2025
Final Product:
Saturday, I was working on a film set, which left Sunday as the last day to complete my quilt materials.
Earlier, I was using the grid, bulge, and fractal textures to try and create more variety in my textures, but they weren't working as well as I wanted them to, so, I used switched to only perlin and billow noise for building the rest of my textures. I was able to quickly get into a rhythm of layering these textures to create all the different looks I wanted for my soil, woods, the charcoals, and rock materials.
The two materials I had decided would definitely necessitate a texture map were the leaf and petal, in order to create realistic plant veins. My texture maps were sourced online, and the petal's hue was desaturated in Photoshop. These maps were used for color and layering the plant veins into the bump maps.
When attempting to render my quilt turntable with Chaos Cloud, I ran into an issue where the Cloud was "rendering" for several hours, but nothing was happening. I ended up rendering this half of my assignement locally, but was successful in rendering the Render Setup layers with the Cloud.


Entry 1: April 16th, 2025
Project 3 -- the Fantastical Plant Project -- focuses on creating a believable animation and render of a magical or out-of-this-world plant. Although we can use models sourced from the internet, I intend to try to create all my assets myself as they are relatively simple.
I started my ideation at the end of March, by researching flowers and writing down three different concepts, along with pros and cons of each. Two days ago, I settled on my concept of light particles that rise off a flower's petals. I created two concept collages in Photoshop to hone, and will likely combine the two.
In today's class, after feedback on our concepts, we started laying out our scenes and cameras in Maya. My goal is to get into Houdini as soon as possible for lighting and particle sims, so this weekend will focus on nailing down my models, UVs and starting on materials.
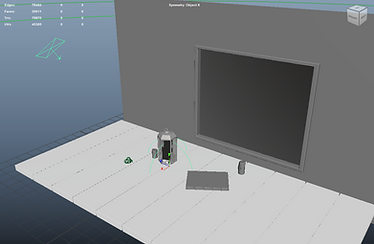
Entry 2: April 20th, 2025
All of the elements in my scene have now been modeled, although models aren't all complete. I've yet to put the leaves I modeled on my flower stems or add the wrinkles and imperfections to my plant that will make it lifelike. In the case that I'm unable to finish my plant and candle models, I have found some models online with which they can be replaced.
I don't want to get too caught up on modeling, as it isn't the focus of this assignment, so I have also moved on to my UVs, texturing, and setting up previs for my lighting, which I still plan to do in Houdini. I chose an HDRI map of an outdoors area, which I now realize will likely not work well, as the majority of reflections facing the camera would be coming from the objects inside the window, not outside.
For texturing, I am reusing as many materials from Assignment 2 as I can, created a list of all materials I don't yet have, and will find my references for those tonight. In the mean times, although I haven't UVed all of my objects, I've assigned materials to many of my objects to get a better feel for this project final look and scope out any issues regarding textures/colors. I already discovered an issue with my wood texture, which was that on an object as large as my table is, the bump depth was way too high and the overal texture scale way too low. I was able to start resolving these scaling issue and the table surface is already looking much better (though I still think it needs further adjusting from here)
My goal is to bring my project into Houdini by Thursday (the 24th) so I can begin messing with my particle setup and emission on the petals.
Entry 3: April 24th, 2025
Finishing touches have been put onto all models and all materials are set up except for the flower pistil. I expect that my materials will need some slight adjustments after moving to Houdini and the Karma renderer, however I'm confident with how they look presently in Maya and VRay.
Photoshop was used to create the textures for more complex materials, like the illustrated book cover and the veins on the plant leaves. I screenshotted the UVs for each asset needing a texture map to line up textures properly in Photoshop, as I had some off-center texture maps in Project 2 and had had to offset my UVs to compensate for them.
Moving forwards I've created many cameras in my scene to play around with the camera movement and framing, and settled on an animation that I like. This camera will be imported into Houdini with the rest of my scene and I can finally focus on lighting, my simulation and any final adjustments.
Entry 4: April 29th, 2025
The past few days have consisted of mostly experimentation and trial and error. I ran into issues when trying to export to Houdini, as the plug-in I intended to use to transfer VRay attributes to MaterialX weren't available on SCAD's computers. After some troubleshooting, I ultimately decided to export each texture maps and manually recreate each material in Houdini.
I have also continued experimenting with VRay and possibly importing my sim to render in Maya. I'm not currently satisfied with VRay's emission materials and am having issues with the lighting. Whichever softwares provides the best lighting will likely be what I choose to render with.
Alongside lighting, I have also designed the look of my particle sim, though I am considering slowing it down. One downside to VRay is that it is hard to test render without loosing all my rendering credits, so I have only viewed the sim by itself so far.
Entry 5: May 2nd, 2025
As per my professors instructions, I have replaced my HDR with a sky made in Unreal Engine. The stars and moon were added to the sky using a plug-in called GoodSky and I used a panorama camera to create a 360 image of the sky to use on a dome light. An HDR of an interior space was then projected on a hemisphere and lit with seveal spotlights to provide the reflections of the room in the glass. This new set-up helped immensely with achieving colors and lighting that match my original vision for the scene.
After a critique in the previous class, small adjustments have been made to the wood shader and glass (albeit the glass is still in need of further improvement) and one classmate pointed out a tangent between the lantern and windowsill edges at the end of my camera animation that I will be fixing tonight. After many setbacks, it is exciting to see this project finally coming together. To alleviate my concerns about potential rendering issues, I intend to start my render within 24 hours, to leave the entire weekend open for potential troubleshooting.


Entry 1: May 9th, 2025
The final project focus on lighting to create an atmosphere and emphasize mood for storytelling. My story will be a murder scene from the classic game "Clue". This murder took place in the billiard room, with the rope (a nod to the 1985 film), with a still unknown killer whose shadow will be revealed briefly by a flash of light.
Unlike with the previous project, most of my 3D models for this scene will be sourced online so more effort can be put into achieving detailed textures and theatrical lighting.
Scene blocking and camera layout was set-up earlier this week, and I have began importing models into the scene. My next goal is to create previs of the lighting and textures to make sure the color scheme I have in mind will work well.


Entry 2: May 13th, 2025
In the past few days, I've researched lighting and gathered references for all materials to prepare for moving forward from previs. I also created a rough lighting set-up and base colors for all materials to solidify my project vision. Following my professors advice, I've set up custom AOVs so I can separate my interior lights from the exterior light flash in post for fine tuning.
I brought back my material quilt and light rig from project 2 to use for material development. There will be 17 different materials (excluding pool ball color variations. More complex textures will be made with substance painter, but for now I'm focusing on procedural textures that can be made in Maya.
My goal is to finish all procedural textures and have a test render of the light flash and silhouette by the end of the week.


Entry 3: May 17th, 2025
More progress on the textures. All materials except those needing to be painted have been completed, and I've begun transferring materials into my scene and reassigning them to assets.
The dartboard colors were created by importing the UVs into photoshop and creating a mask for each color's geometry faces, and similarly, the white rim of the painting was added using photoshop and lined up with the painting's imported UVs.
Addition of metals and subsurface altered the look of lighting more than I expected. Currently, the colors feel slightly oversaturated in areas and the photo frame stands out more than I'd like.


Lighting Test (Above) and Camera Movement Playblast (Below)